Cara Install Visual Borland Delphi 7 by : Mutia Nike :
- Masukan CD Software Visual Borland Delphi 7
- Klick Install.exe – klick open,maka akan tampil tampilan pilihan instalasi Visual Borland Delphi 7 Enterprise Edition :
- Klick Delphi 7 untuk menginstal, maka akan tampil Borland Delphi 7 Enterprise Edition – Installation Wizard, klick Next.
- Masukan Serial Number dan Authorization Key, Serial Number dan Authorization Key dapat anda lihat di CD Serial Number.txt, klick Next.
- Klick pada pilihan I accept the terms in the license agreement, untuk menerima pernyataan lisensi yang ada di Borland Delphi 7 Enterprise Edition, klick Next
- Pada Important Installation Information anda klick Next
- Pada Setup Type anda Klick pada pilihan Custom untuk menginstal komponen program yang ada di Borland Delphi 7 Enterprise Edition, klick Next
- Pada Custom Setup, pilihan Program Files,anda klick Next
- Pada BDE SQL Driver Configuration anda klick Next
- Pada Choose VisiBroker anda klick Next
- Pada Microsoft Office Controls, anda pilih pilihan Office XP untuk Operating System Microsoft Windows XP, klick Next
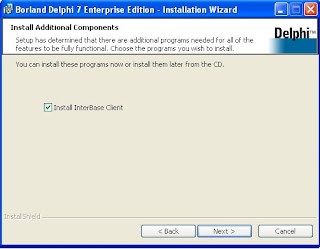
- Pada Install Additional Components anda klick Next
- Pada Destination Folder, komponen Delphi yang disimpan dan diinstall pada Drive C, anda klick Next
- Pada Save Installation Database, anda klick Next
- Pada Ready to Install the Program, anda klick Install, untuk memulai proses penginstallan
- Tunggu beberapa saat pada proses penginstallan
- Pada InterBase 6.5 Setup Wizard anda klick Next
- Pada Setup - InterBase 6.5 Software License Agreement anda klick Yes
- Pada Setup - InterBase 6.5 Important Installation Information anda klick Next
- Pada Setup - InterBase 6.5 Select Destination Directory, anda pilih C:\Program Files\Borland\InterBase, lalu anda klick Next
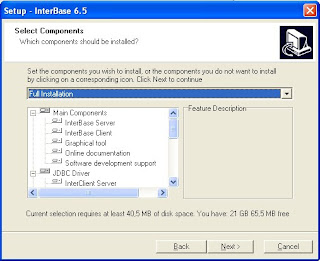
- Pada Setup - InterBase 6.5 Select Components, pilih pilihan Full Installation, lalu anda klick Next
- Pada Setup - InterBase 6.5 Select Start Menu Folder, anda klick Next
- Pada Setup - InterBase 6.5 Ready to Install, anda klick Install
- Untuk proses penginstallan tunggu beberapa saat,sampai proses penginstallan selesai
- Pada akhir penginstallan Setup - InterBase 6.5 selesai, anda klick Finish
- Pada Java(TM) 2 Runtime Environment, Standard Edition, v 1.2.2-001, Software License Agreement, anda klick Yes
- Pada Java(TM) 2 Runtime Environment, Standard Edition, v 1.2.2-001, Choose Destination Location, anda klick Next
- Tunggu beberapa saat pada proses penginstallan Java(TM) 2 Runtime Environment, Standard Edition, v 1.2.2-001 Setup selesai
- Informasi proses penginstallan Java(TM) 2 Runtime Environment, Standard Edition, v 1.2.2-001 Setup selesai dan mulai proses penginstallan VisiBroker for Cpp 4.5
- Proses awal penginstallan VisiBroker for Cpp 4.5, klick Next
- Pada VisiBroker for Cpp 4.5, Software License Agreement, anda klick Yes
- Pada VisiBroker for Cpp 4.5, Choose Destination Location, anda klick Next
- Pada VisiBroker for Cpp 4.5, Select Components, anda klick Next
- Pada VisiBroker for Cpp 4.5, VisiBroker Installation, anda klick Next
- Pada VisiBroker for Cpp 4.5, Setup Options, anda klick Next
- Pada VisiBroker for Cpp 4.5, Select Program Folder, anda klick Next
- Pada VisiBroker for Cpp 4.5, Start Copying Files, anda klick Next
- Tunggu beberapa saat proses penginstallan Pada VisiBroker for Cpp 4.5 Setup
- Proses penginstallan Pada VisiBroker for Cpp 4.5 Setup selesai, klick Finish
- Proses total akhir pada Installation Wizard Completed selesai, lalu anda klick Finish
- Merestart


sepp
BalasHapus